The LTIB (Linux Target Image Builder) project is a simple tool that can be used to develop and deploy BSPs (Board Support Packages) for various target platforms. Using this tool a user will be able to develop a GNU/Linux image for their target platform.
This instruction helps to build and install LTIB for conga-QMX6 (based on Freescale ® i.MX6 ARM ® Cortex A9) on Ubuntu 14.04 Linux.
1) Get LTIB Linux BSP from Freescale site: https://www.freescale.com/webapp/Download?colCode=L3.0.35_4.1.0_ER_SOURCE_BSP&appType=license&location=null
You must be registered user for download this link.
2) After download is finished unpack it into any directory, f.e. into home dir.
3) Run ./install
4) Install Host Packages Needed by LTIB
The Ubuntu 14.04 requires additional packages for LTIB installation. Install these packages as follows:
|
1 2 |
$ sudo apt-get install rpm bison m4 zlibc zlib1g zlib1g-dev libncurses5-dev zlib-bin liblzo2-dev uuid uuid-dev libglib2.0-dev libx11-dev libdbus-glib-1-dev liborbit2-dev intltool libgtk2.0-dev texlive texinfo |
5) Packages Required for 64-bit Ubuntu
If you use 64-bit Ubuntu, then install the lib32z-dev package
|
1 |
$ sudo apt-get install lib32z-dev |
6) Create or Modify Fuse Rules
|
1 |
$ sudo bash -c 'echo "KERNEL==fuse, NAME=%k, MODE=0755, OWNER=root, GROUP=fuse" > /etc/udev/rules.d/99-fuse.rules' |
7) Edit Sudoers File
• Run ‘sudo visudo’ to edit the sudoers.tmp file.
|
1 |
$ sudo /usr/sbin/visudo |
• Add the following line to the end of the sudoers file:
|
1 |
[YOUR USERNAME] ALL = NOPASSWD: /usr/bin/rpm, /opt/freescale/ltib/usr/bin/rpm |
• Press ctrl + O and Enter to save the file
• Press ctrl + X to exit.
8) Now we must patch some files. Note that, it must be done from ltib folder itself.
|
1 2 3 |
wget https://community.freescale.com/servlet/JiveServlet/downloadBody/93455-102-2-2825/patch-ltib-ubuntu12.04.sh ./patch-ltib-ubuntu12.04.sh |
It will download ubuntu-ltib-patch.tgz
|
1 2 3 |
tar -xzvf ubuntu-ltib-patch.tgz ./install-patches.sh |
9) Patch the m4 package. Unpack m4-1.4.16.tar.gz in pkgs subdir (or in /opt/freescale/pkgs/ ) somewhere. In the file /lib/stdio.in.h find this strings:
|
1 |
_GL_WARN_ON_USE (gets, "gets is a security hole - use fgets instead"); |
and rewrite it with:
|
1 2 3 |
#if HAVE_RAW_DECL_GETS _GL_WARN_ON_USE (gets, "gets is a security hole - use fgets instead"); #endif |
Save file and compress it to a new m4-1.4.16.tar.gz. Copy it back to pkgs dir. Check the new md5sum and change the md5sum in m4-1.4.16.tar.gz.md5
10) It’s time to run ./ltib
It will take a really long time to complete installation!
11) In case of ‘busybox’ error.
Go into ltib/dist/lfs/base_libs/base_libs.spec and find these lines:
|
1 2 3 4 |
# remove absolute paths from text search files (if they exist) perl -w -e ' @ARGV = grep { `file $_` =~ m,ASCII C program text, } @ARGV; exit(0) unless @ARGV; |
Remove the last two (the lines beginning with “@ARGV” and “exit(0)” and you should be good to go.
Run ./ltib again.
12) In the configuration window:
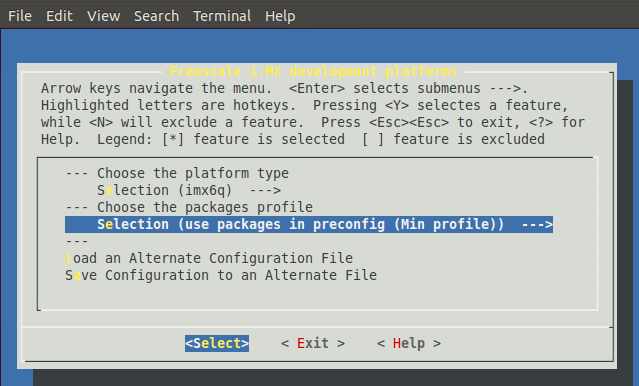
Select platform choice [Freescale iMX reference boards]. Use the arrow key to select ‘Exit’ and hit Enter.
Select Yes to save the configuration file.

Under “Choose the platform type”, use the down arrow key to highlight selection option. Hit Enter to select the platform type.
Select [imx6q] and hit Enter to return to the Selection screen.
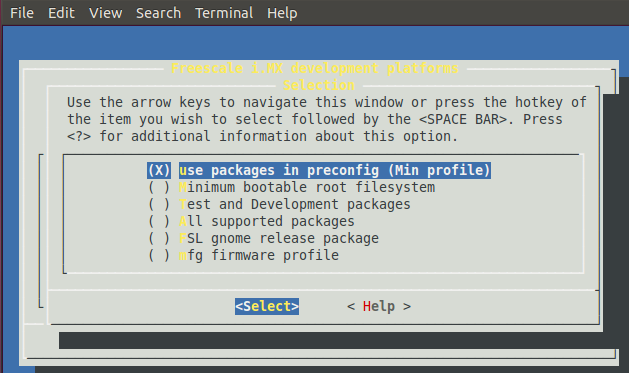
Choose the packages profile. Select the minimum profile (default configuration). This profile installs only the core packages and does not
support graphical interface. If you need to change the profile later, issue the command ./ltib -m selectype in .
Select Exit and save the configuration. This brings you to the main LTIB configuration screen.
Scroll down with the arrow key to choose the board for u-boot. Hit Enter to select the board for u-boot
Select [mx6q_sabresd] and hit Enter.
Select ‘Exit’ and save the configuration.
At this point the Ltib enviroment is built.


